Three-tier architecture application

Date : 07/11/2022
Reading time : 3 Minutes
Description : A customer has several data centers. Due to global warming, it becomes important to optimise the air conditioning control of these data centers...
Project categories :
Find the project on : GitHub
Project members :
I/ Implementation of the application using Flask
So, the application was made with Flask, a micro framework for web development in Python.
We will build a web application based on a three-tier architecture.
The two-tier architecture characterises client/server systems in which the client requests a resource and the server provides it directly. This means that the server does not call on another application to provide the service. In the 3-tier architecture, there is an intermediate tier, i.e. there is usually a shared architecture between :
- The client (the resource requester)
- The application server (also called middleware, i.e. the server responsible for providing the resource but calling on another server)
- The secondary server (usually a database server … providing a service to the first server)
In the three-tier architecture, by contrast, server-level applications are delocalised, i.e. each server is specialised in one task (web server and database server, for example). Thus, the three-tier architecture allows :
- greater flexibility
- greater security (security can be defined for each service)
- better performance (tasks are shared)
Hence, we have adopted the following architecture for our project:
├── README.md
├── __pycache__
│   ├── app.cpython-310.pyc
│   ├── basedonnee.cpython-310.pyc
│   └── visualisationDonnees.cpython-310.pyc
├── app.py
├── basedonnee.py
├── bd.sqlite
├── logs.txt
├── static
│   ├── images
│   │   └── visualisation
│   │       ├── humidite.png
│   │       ├── pression.png
│   │       └── temperatures.png
│   └── styles
│       └── style.css
├── templates
│   ├── base.html
│   ├── contact.html
│   ├── form.html
│   ├── index.html
│   └── infosVille.html
├── tests
│   ├── __pycache__
│   │   └── conftest.cpython-310-pytest-7.2.0.pyc
│   ├── conftest.py
│   └── functional
│       ├── __init__.py
│       ├── __pycache__
│       │   ├── __init__.cpython-310.pyc
│       │   └── testsPages.cpython-310-pytest-7.2.0.pyc
│       └── testsPages.py
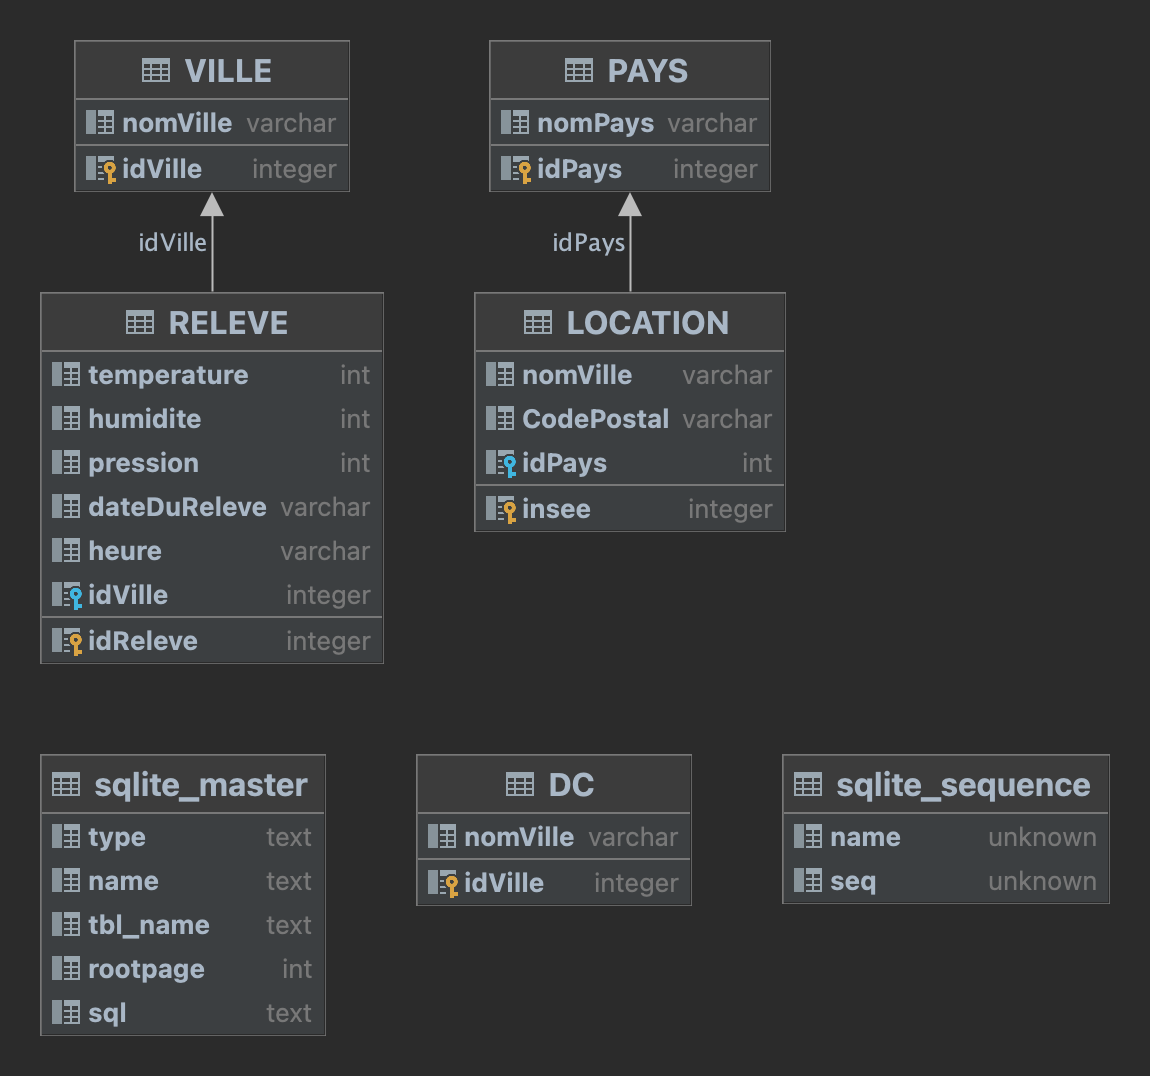
II/ Database
For our 3rd layer, the database layer, we used SQLite.
Below is the diagram generated by PyCharm of the database we modelled:
III/ API requests
To get the data, we used the following API: wttr
In Python, to make API requests, the use of the requests module is necessary.
IV/ Data visualization
To perform a visualization of the data, we used the python module matplotlib.pyplot.
V/ Form
For the site form, we used the flask_wtf module from python.
VI/ Unit tests [experimentation]
I decided to try this part of the project which was optional.
I therefore proceeded as follows:
- Enclose our entire application in the
create_app(test_config)function - Create a
.envfile for a better organisation of the project. In this file the variableSECRET_KEYhas been placed.
def create_app(test_config=None):
    app = Flask(__name__, instance_relative_config=True)

    if test_config is None:
        app.config.from_mapping(
            SECRET_KEY=os.environ.get('SECRET_KEY'),
        )
    else:
        app.config.from_mapping(test_config)